Welcome to Simply Fred!
I will be posting photos from my favorite and latest Real Estate photo shoots.
Also, occasionally posting random photos of stuff that makes me happy or was just fun to shoot.

Monday, February 22, 2010

Week 7: Architecture


Photos of the Week

Week 7 Assignment: Architecture

I have always been very interested in Architecture and the beauty a building or structure can create. Architecture is an art and every person has their preference on what they like, for me, it is Modern Architecture.

I have chosen three photos of the week with different aspects of architecture:
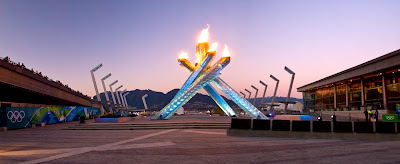
The first is structural architecture in the Vancouver Olympic Torch. I had the opportunity to make it up to Vancouver over the weekend, which is only 3 hours away. I am pretty sure I will never live closer to an Olympics than this one, so I made it a point to go check it out. The Torch looks like four ice crystals forming a pyramid with the flame on the top. I tried to capture it at dusk with the sunset in the scenic mountains in the background.

The second is a nice Modern building, the Boeing Museum of Flight hanger, which is a lot of metal and glass, always beautiful. The third is another variation on the Museum of Flight with the older, "Red Barn" Boeing office building in the foreground in juxtaposition with the hanger in the background to give you two styles of architecture, older and newer, classic and modern, in one image.

Coming Next:
Week 8 Assignment: Senior Portraits

Monday, February 15, 2010

Week 6: Headshot


Photo of the Week
Week 6 Assignment: Head Shot Portrait

The Head shot portrait is your standard portrait used for school, office, or to take to auditions for acting gigs to become a star. In the case of Debbie above, this portrait is for her inductee to the USSSA Washington Softball Hall of Fame.

This portrait was made with an off camera flash and a simple background. I set up the flash, off camera tethered by cable, and shot it through a white photo umbrella. This diffuses the light from the flash, in essence, softening the light so you do not create hard shadows on the background behind the subject. What this also does is create a good "catchlight" in the eyes of the subject, giving them life. The catchlight is actually a new thing I learned or became aware of and you definitely notice a difference when you have one.

Coming Next:
Week 7 Assignment: Architecture

Monday, February 8, 2010

Week 5: Self Portrait


Photos of the Week
Week 5 Assignment: Self Portrait

A Self Portrait can be a tricky thing. First of all, you have to take the picture yourself, and secondly, what do you want to convey or say about yourself in capturing yourself. The first can be done with the right equipment (i.e. tripod and a remote cord) and a self timer, but it may take many tries to get yourself in focus and framed just how you want. The second involves some thought on who you are (in case you don't already know).

The top portrait took a couple of "sittings" with myself to find the right angle and closeness to the camera I was looking for. I could have done a full body length or a simple head shot, but I chose something a little more intimate in the end. I believed this would allow the viewer a little more insight or view into the soul of Fred, through my eyes. The eyes are usually the center of a great portrait(should also be in sharpest focus) because they can tell a story about someone better than anything else, and of course the closer the better...usually.

The bottom portrait tells a little bit different story, which is what I do for a living (besides photography) and also love to do, which is Drive. I deliver stuff for a living and drive 200-300+ miles per day for my Courier business. I wanted to portray this with a little action. To do this I needed a little motion in the shot, but not me. I set up my small gorillapod in my truck with a remote cord attached. I shot with a slower shutter speed (@ 1/4th of a second) and used the flash set on rear sync mode. This would allow the world outside my truck window to move by for a short time(creating a blur) and then the flash would go off at the end of the shutter opening to freeze and illuminate me on the inside of the truck, which was much darker than the outside. Also, do not forget to smile appropriately with the "greedy" face.

Coming Next:
Week 6 Assignment: Head Shot Portrait

Monday, February 1, 2010

Week 4: Black & White

(Color)
(Straight greyscale or desaturation)


(Finer tuned b&w conversion)
(click images to see larger version)

Photos of the Week
Week 4 Assignment: Black & White
Black & White photography requires a special skill from the photographer, the ability to see in Black & White. This skill can take many years to perfect, that is, if it is possible to perfect. It seem like everything in the old days were b&w since the only photos from back then were in b&w. It makes you wonder if anybody even had shirts that weren't white or grey, or if all houses were white or grey. I imagine it to be easier then to see in b&w, even if that were not the case.
Today is different, since we have had color film for well over 60 years. Before digital you would choose to shoot with color film or b&w film, and the resulting photo is what you were stuck with. Today, with almost all digital cameras, you can also choose to shoot in color or b&w (even sepia and other options on some). If your camera has a "live-view" LCD (as almost all point and shoot cameras have, and most newer DSLR cameras have) then you actually have the capability to "see" in b&w, when your camera is set to shoot it. If you choose to shoot in b&w, however, you are once again, stuck with a b&w image. On the other hand, if you shoot in color, you always have the ability to convert it to a b&w image using any photo editing software (if shot in b&w, you Cannot convert it to color). The reason I mention this is so you do not limit yourself, or your image to being one or the other. I do not recommend shooting in b&w for this reason, unless you are 100% sure you will never want to see it in color.
The b&w conversion process can very in complexity, from simply clicking a button in the editing software to convert to b&w or setting the sturation level to zero, to doing a more complicated conversion of working in greyscale and adjusting the many color channels, contrast levels, and curves to finely tune the conversion. The latter can be similar to shooting with b&w film and using different color filters (red, green, yellow, etc.) to get the look you are striving for.
Coming Next:
Week 5 Assignment: Self-Portrait